A New Life For An Old European Cut Diamond
I am very excited and honored to share the story behind this truly magnificent old European cut (OEC) diamond ring that I recently completed as a custom anniversary gift for a loyal client. When I describe this ring as magnificent, I mean it in every sense of the word. It has diamonds, gold, platinum, and even a hidden heart-shaped ruby! It certainly is not your typical anniversary ring, but before I give too much away, let’s walk through how this beauty came to be.
The Request
I had previously worked with my client, Kim, on her stunning custom Fine Columbia Emerald Ring, so I knew I would truly enjoy working on another project with her. When she initially contacted me for this commissioned piece, she was looking to create something romantic with a vintage yet modern touch to commemorate this momentous achievement in her loving marriage. So when she mentioned using an old European cut diamond, I immediately said YES!
A Brief History of OEC Diamonds
An old European cut diamond is a round diamond primarily cut between 1890-1930. These antique diamonds were one of the predecessors to the modern round brilliant cut diamond, which is the most popular diamond shape today.

(image credited to gemsociety.org)
OEC diamonds were cut for carat weight rather than brilliance. Because of the shape of rough diamonds, the end result was a deep cut with a high crown and small table. They are also less sparkly than modern brilliant cut diamonds as they were cut and polished with the luminescence of candlelight in mind. Perhaps OEC diamonds’ true charm lies in their hand-cut imprecisions. Cutters had to rely on their eyes rather than modern machines to cut these diamonds, making each stone unique.
I simply adore OEC diamonds! As an artist, they are my personal favorite cut for a diamond. Each OEC is so alive and truly one of a kind. I am also an advocate of working with recycled stones, which all OEC diamonds are since they are no longer being produced. It's the opportunity for me to give an Art Deco-era diamond a whole second life to be worn by a contemporary jewelry lover. In essence, designing a piece of jewelry around an OEC diamond is a dream come true!
Finding the Stone
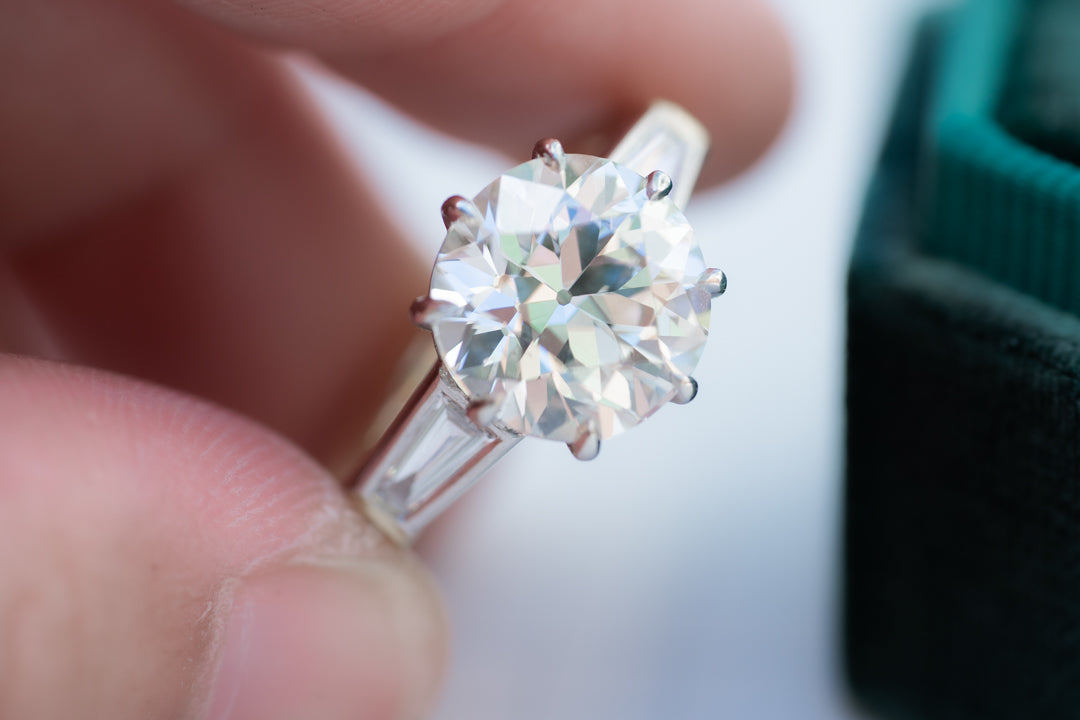
Kim and I began by discussing her budget and her ideas about the ideal diamond for the ring. I had to track down a stone that aligned perfectly with her aesthetic requirements. After a LONG time of searching near and far, I found the EXACT diamond she had her heart set on: a 3.58 ct OEC diamond in J color.
When it comes to J color diamonds, although they fit the “near colorless” range of the GIA’s color scale, it is the lowest color grade to still appear near colorless. However, this stone in particular appeared to be much brighter and whiter when face-up, which is typical for OEC diamonds.
It was love at first sight for both Kim and me. She immediately said, “YES!” to the OEC diamond, and I was ecstatic to begin work on this special OEC project! Don’t take my word for it though! Watch the stone itself in all its glory in the videos below.
Design Discussions & CAD Renderings
With the diamond selected, Kim and I could begin the ring’s design process. We talked about a variety of different options including making a simple bezel setting in 18K yellow gold, only focusing on the center diamond, and having micro pavé on the ring band.
Since Kim wanted the ring to have a retro look, I began with research. I scoured through countless images and specifications of vintage jewelry. After presenting her with my ideas, we both agreed that the following design perfectly embodied classic yet modern motifs of the era: a three-stone ring with two tapered baguette diamonds on each side. A sigh of happiness...This was getting good.
I immediately got to work on the CAD file, and we creatively went back and forth on the renderings, fine tuning small details along the way. For the center stone, we had to decide between four or eight prongs. The best part of working with me, or any jewelry designer who does custom pieces, is that the client is very much involved in every step of the project. Stone and material selection, design input, and more. My clients get a one-on-one immersive experience with me that cannot be replicated and adds to the cherished memories they will associate with the piece.

As you can see, there was no question when it came to the prongs. Once Kim and I saw the CAD images, it was eight prongs for the win! At this point in our decision making, I suggested using platinum for the head setting with a yellow gold band. The diamond was just colorless enough to use a platinum head. However, if the diamond had been more yellow while face-up, I would have suggested the yellow gold.
Something Was Missing!?
I was thrilled with the design and so was Kim, but then she said the words that every jewelry designer fears, “Hmm, wait a minute…” So many thoughts flew through my mind. Was she unhappy? Did she want to change the entire design? Did she no longer want to use an OEC diamond!?

“I just feel like something is missing in the band. You KNOW how much I love a pavé band,” she explained.
Kim was referring to the Fine Columbia Emerald Ring I had made for her in the past. Admittedly, my first reaction to her pavé band idea for this anniversary ring was N-O. Don’t get me wrong, I adore the emerald ring I designed for Kim, but its pavé band was not easy to work with. I used tiny diamonds which gradually increased in size from the top of the band and around, thus rendering it unresizable.

Still, Kim insisted on the pavé band for the anniversary ring, too. I reworked the CAD rendering to make the new pavé band work with the design while not taking attention away from the three stones. The final result...

The band now had small, bright cut diamonds all round in the pavé setting. I added the yellow gold wall along with the baguette setting to establish a connection between the two different metals. This pivot was a hit with Kim!
The Great Debate & Instagram Poll
Even though I was pretty sure that the platinum head was the way to go, I had to be 100% certain that the OEC diamond wasn’t pulling a yellow tint. So I whipped up one platinum casting and one yellow gold casting on the heads, and I took it to the people! I posted the poll below through my Instagram story, and surprisingly, the yellow gold had the votes and won! But Kim and I still felt that the platinum head harmonized better with the diamonds and overall design.

Time to Create
With the platinum head as our final choice, all I had to do was CREATE the ring. (HA!) However, no written words could ever do this process justice, so I won’t even attempt to try. Watch the videos below to see a future heirloom in the making!
Finishing Touches
Per Kim’s final request, I hid a heart-shaped ruby in the band beneath the center stone (another intricate but rewarding challenge), and flanked the sides of the ruby with engravings of Kim’s and her husband’s first initials. A sweet touch for a very special anniversary ring!

I am beyond grateful that the ring turned out exactly as Kim had imagined. What a whirlwind project that resulted in the best possible result! I hope to work with her again on many more creative and show-stopping custom pieces.
Final Specs
3.58 ct OEC diamond
0.18 ct baguette diamonds
0.3 ct side melees